Now that I'm getting heavily into the writing part of my thesis, I've had the chance to procrastinate on the actual writing by looking into multiple arrangements, setups, and tools to support my actual writing process. There are many things to manage when writing a thesis: references, notes, drafts, citations, layouts, versioning, backups, and perhaps even more depending on your specific field. So I've decided to put together a quick walkthrough about my own process and workflow and how I've set up different tools across the research and writing process, along with links to additional resources.
Before I begin, however, a warning: the process described here is unnecessarily complicated, and you can probably get by with a much easier setup. I basically took this path because I wanted to learn about several of the tools involved, and because my current setup is hard to put together upfront, but requires very little management as I go along. So, that being said, you should think carefully about what you want to write and how best to support that process.
Reference Management: Zotero
Once you start doing research, you'll quickly start to pile up on long lists of references including books, articles, book chapters, documents, conference papers, and so on. It gets hard to manage it all in a way that you can still find them several months later, and that you can keep track of the reference information once you want to start doing citations in your writing.
There are many tools available that do this, but my personal choice so far has been Zotero, and I can no longer remember a world in which I did research without using this. Zotero works either as a Firefox plug-in or as a standalone app if you use any other browser, and is basically just a database where you can keep track of references and store metadata based on the reference type. That's helpful, but not impressive. What's great about Zotero is that it integrates with your browser (Chrome and Safari users need to install the additional Zotero Connector for this) so it can automatically capture metadata for references from sites such as Amazon, Google Books, or most online journals I've run into. When you're viewing a page where metadata is available, an icon shows up on the URL bar and when you click on it, Zotero downloads all the available information for that source - and if you have the permissions for it, it will often download a PDF version of the article for local storage as well. It also keeps track of when you captured a web page or blog post and takes a snapshot of it for reference purposes, and then you can sort your master list of resources into collections based on topics or arbitrarily for papers or articles you're working on.
If the automatic capture doesn't work (which sometimes happens), you can also add resources based on their ISBN or their DOI numbers. And if all else fails, or you're working with non-standard sources (like documents, audio recordings, or other non-indexed things) you can always do manual entry.
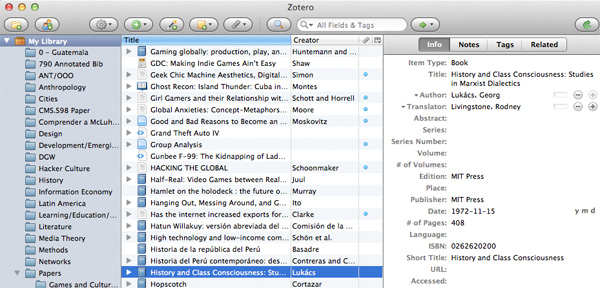
The Zotero interface allows you to build collections of resources and export references lists for them
Zotero is also super helpful for writing: the MS Word Zotero Connector adds an extra toolbar to your Word layout specifically for citation management. This allows you to introduce citations referencing something on the Zotero database directly, then automatically generating a list of references used when you're done, and making it super simple to switch between citation styles like Chicago, APA, MLA, or whatever works for you. If this is something that you spend a lot of time thinking about, you need to stop - computers are much better at doing this, and your procrastination time can be better spent elsewhere.
Additional resources:
- Zotero at MIT
- RefWorks, an alternative reference management tool
- EndNote, another alternative reference management tool
- Mendeley, yet another alternative reference management tool
- Zotero Forums
Writing: LaTeX
There's no shortage of tools to actually get your writing done. Some people just go for MS Word, some people like Apple's Pages, some people are just using something like Google Docs. A lot of people lately are swearing by Scrivener.
I decided to go with LaTeX, probably because I like the pain of it.
LaTeX is not really writing software - it is technically a language or syntax to define commands and parameters that LaTeX then takes into account to generate a typeset version of your writing. What LaTeX does is it separates the content creation from the styling and design of the document, so you stop thinking about things such as typefaces, font sizes, and how to make things look pretty, and you just focus on the writing. Then you need little more than just plain text files to do your writing, and to learn some of the important LaTeX commands to introduce into your file when you want to do things such as add emphasis, quotes, citations, chapters, sections, and so on. You define the structure in your file - a simple text file - and then LaTeX takes care of everything else when compiling.
Now, learning your way around LaTeX can be hard, especially if you have no coding experience whatsoever (even if you've done some HTML at some point, that'll probably be enough). But while setting up LaTeX to work for you can take a few hours upfront, once you're happy and comfortable with your setup you're pretty much good to go. There are packages and options for pretty much everything you may need - graphics, tables, pictures, formulas, languages, citation styles, various output formats and layouts - and everything you use is defined in files that you can edit, so if you want to change how LaTeX treats headers or margins or anything, you can do it once and have that change reflect across the entire document.
The LaTeX package for Mac OS X, MacTex, comes with pretty much everything you need to get started and even with packages and macros that make a lot of things easier. I like to use Sublime Text to do my writing which also has TeX syntax highlighting, and then just use the pdflatex command on the terminal (included in MacTex) to generate my output, which is generally a nice looking PDF file. And you can find tutorials, templates and tools around the web to do most anything.
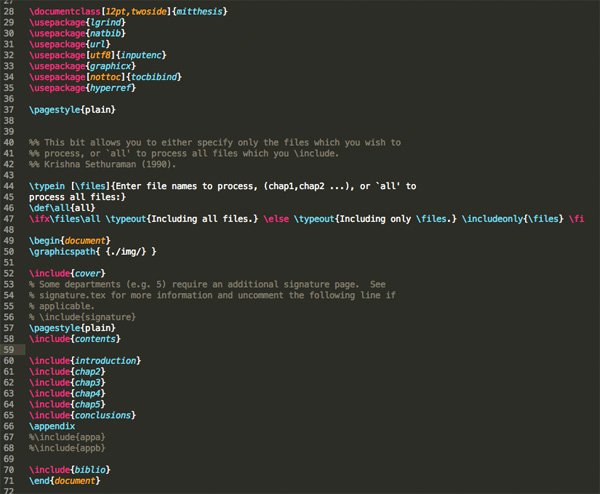
A sample base LaTeX file using MIT's thesis template. Packages and files are imported into this file to be processed for output
TeX and LaTeX have been primarily used for writing in natural sciences and mathematics, where lots of typesetting of equations and formulas take place, but you can really use it for anything if you find it convenient. At MIT, there's even LaTeX thesis templates available that have a lot of the scaffolding already in place, and I'm sure there must be similar options at other schools - you can then add any specific packages or options you want to use directly into those. And because LaTeX is pretty modular, you can split up large documents into individual files and then include the pieces into a master layout, which makes it easy to include or exclude things just by commenting out lines, or to reformat sections if you wanted to turn a paper into a chapter or an article, or the other way around.
Additional resources:
- An Introduction to LaTeX
- The Not So Short Introduction to LaTeX
- The Comprehensive TeX Archive Network
- Using LaTeX with languages other than English
- Importing graphics to LaTex
Citations + Bibliography: BibTex
Because LaTeX is not a full word processing solution but just a typesetting processor, it gets a little trickier to do things such as references and citations. Not too tricky, though: that's where BibTex comes on.
BibTex is the format in which you need to have your references for LaTeX to understand them. Luckily, Zotero can export directly into the BibTex format, so you can select whatever sources you want to use, export them as a BibTex file, and then add the contents of that exported file to the master .bib file you've told LaTex to use.
BibTex references look something like this (example taken from here):
@article{greenwade93, author = "George D. Greenwade", title = "The {C}omprehensive {T}ex {A}rchive {N}etwork ({CTAN})", year = "1993", journal = "TUGBoat", volume = "14", number = "3", pages = "342--351" }
Zotero generates that format for you automatically. When in LaTeX, depending on the package you're using to generate bibliographies and citations (I'm using natbib for the time being), you'll use the unique identifier for the reference - in this case, "greenwade93", the first element in the reference definition) and tell LaTeX you're pulling from that BibTex reference. Later on in your LaTeX file you'll also insert a specific command where you want your generated bibliography to go. When compiling, LaTeX automatically looks for the information in the BibTex file and puts together the pieces for you.
(Of note: because LaTeX and BibTex both use various intermediate files when compiling, it is usually a good idea to run the compiling multiple times when making big changes to layout or bibliography. Usually, I run pdflatex - bibtex - pdflatex - pdflatex when I want to make sure everything's put together correctly.)
If you're working with Zotero and MS Word the process of introducing citations is way easier. But I just find it incredibly painful to work on MS Word for anything longer than 15 or 20 pages, and then managing styles and formatting is always, always a pain. This way, I can work on modular files and then bring it all together easily with a master file with consistent styling, and once you get used to looking for references in your BibTex file, pulling the identifier, and then inserting that with the \cite or \citep commands in LaTeX, it becomes pretty much the same in terms of the hassle. For managing a longer document, this is definitely easier for me because you have to keep track of less moving pieces.
Additional resources:
- Zotero with LaTeX and BibTex - MIT Libraries
- LaTeX Bibliography Management
- Reference sheet for natbib usage
- The biblatex package
- Getting Started with biblatex
- Using an Organisation Name as an Author in BibTex
- URLs in BibTex bibliographies
Versioning + Backups: Github
One of the coolest points for me about this setup is that everything is just stored as plain text files - LaTeX and BibTex files are just plain text files with specific syntax on them. So not only can I just use Sublime Text or any other text editor to work on this, it also means it's especially convenient to use Git for versioning.
If you don't know Git, it's a version control system used by programmers to keep track of code changes. The logic of Git is that you "commit" all of your changes to a repository, try them out, and if something doesn't work you can roll back to a previous version of the code. If you want to try something different or experimental, you can "branch" your code, work on that branch, and if you're satisfied with the results you "merge" the code back to the main branch. If you're not, you can just roll back to when you first branched out and it's like it never happened.
While this works really well with code, it can also be really helpful for writing, when you're adding and trying pieces, sometimes rolling back to previous versions. Git can keep track of all of that really efficiently for you. Even better still: if you use Github, you can even keep a copy of your "repository" - the directory you're keeping track of - online, and use Github's client (available for Mac and Windows) to manage committing changes and pushing them online. By doing this, you not only have versioning, but you also keep an online backup of everything that you can easily clone to any other machine if needed.
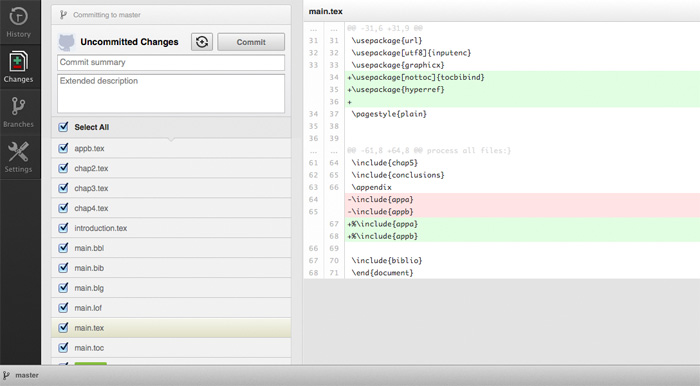
The Github application keeps track of changes to files, including additions and deletions, every time you commit changes
Setting this up is super simple. First, make sure you have a Github account - I signed up for one of their paid plans so I could store everything in a private repository rather than a public one. Then download the Github application, and with it you can initialise a repository file wherever you're currently housing your writing files. Github manages all the behind-the-scenes action of initialising Git for you, and using the application, whenever there are changes made to the files in that folder, you have the choice of committing them (basically, saving changes) and then synching to Github for online storage.
Additional resources:
How It All Ties Together
So this is basically how it works:
- Read stuff, save it to Zotero, add notes and save quotes you may want to use later.
- Write stuff using the LaTeX syntax with whatever text editor you like.
- When you want to cite stuff, get the BibTex format from Zotero, add to your main .bib file and use the identifier to cite on your LaTeX file. (You only do this once for every source - you can then cite it as often as you want.)
- Save your changes, commit them on the Github app and synch to Github.com.
Is that a lot of overhead? Yeah, maybe. You can pretty much get the same thing done with Zotero + Word + Dropbox, honestly. But I really like the modularity of having all these pieces, and especially the flexibility of using LaTeX, which makes it easier for me to repurpose sections of content with minimal changes and much easier to deal with long, complicated, and especially constantly changing files. So if putting together any of this appeals to you, you might find the setup interesting - at the very least you get to learn how to use some additional tools, which is always nice. At best, you get a versatile writing solution you can adapt to multiple purposes without going insane about why styles are not being applied consistently on your document.